Corporate Portrait Lighting: Producing Professional Results for Busy Clients
Corporate portrait photography means you need to be able to adapt, be flexible, not waste anyone’s time and produce great images quickly. You’re not only dealing with people, but with people who are busy and don’t really have time for this, so you better be well prepared!
Understanding your options and limitations, knowing when and what choices to make can be overwhelming. The key is to keep things simple. Today I will teach you my approach to light and how to modify it, show you how you can be mobile on location and what you need for a basic but efficient tiny studio setup.
Corporate Portrait Lighting: Studio Vs. Natural Light
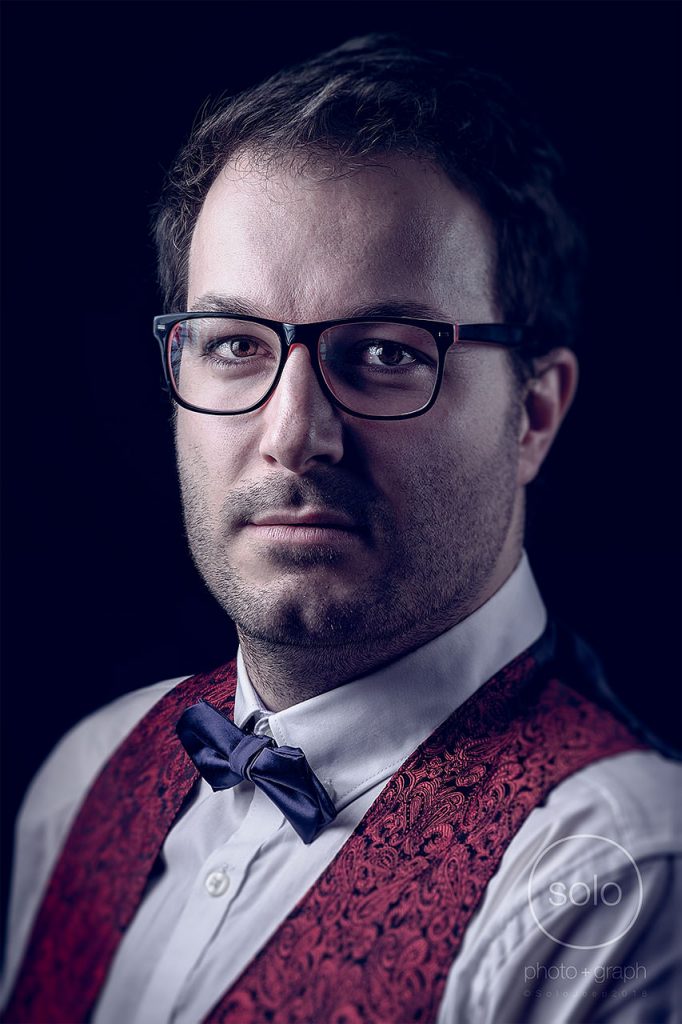
In a studio setting working with flash, strobe or continuous light, ambient light is something to avoid. You’re in a controlled environment for a reason; shaping and tweaking your photos to match exactly what you envision, eliminating the unpredictable.
If desired, it’s entirely possible to create a studio setup to mimic natural light and trick the viewer into believing it was shot using actual window light, while in reality using strobes, colored gels and reflectors. A great advantage to creating daylight when needed and exactly to your liking, is eliminating the weather factor and not having to worry whether your subject is available at the exact right time when the sun comes out for a split second (I’m looking at you Seattle!).
Plus business people are busy people, and tend not to be too flexible in that regard so you’ll need to adapt and avoid surprises.
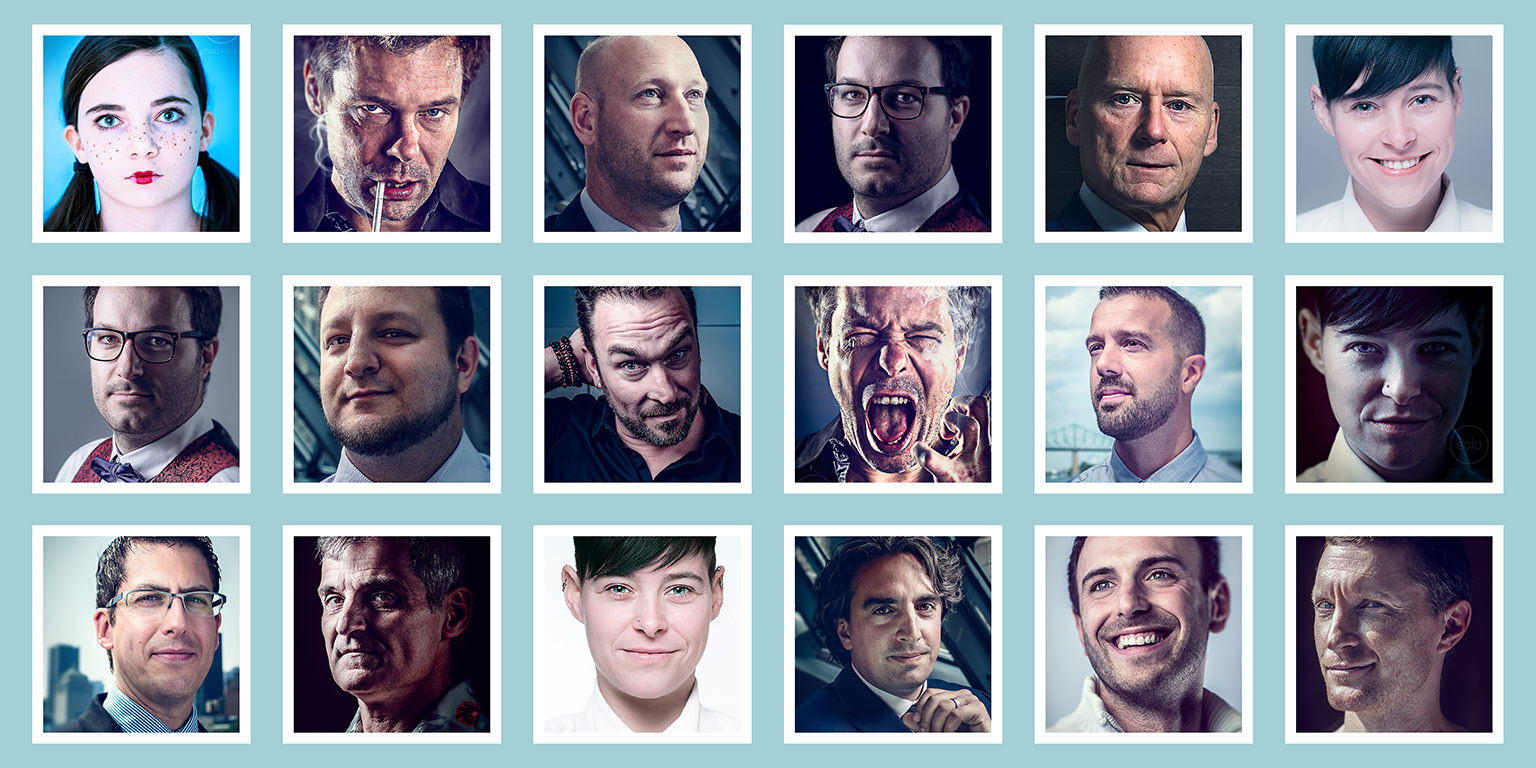
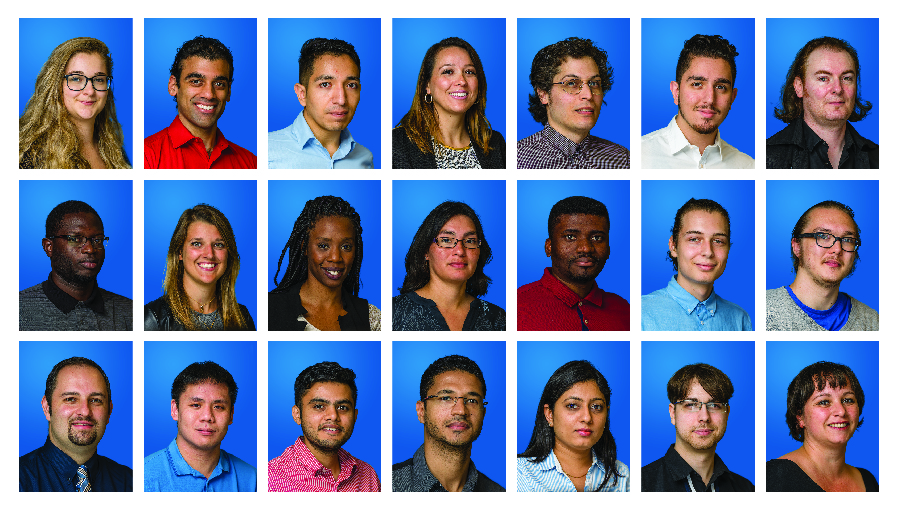
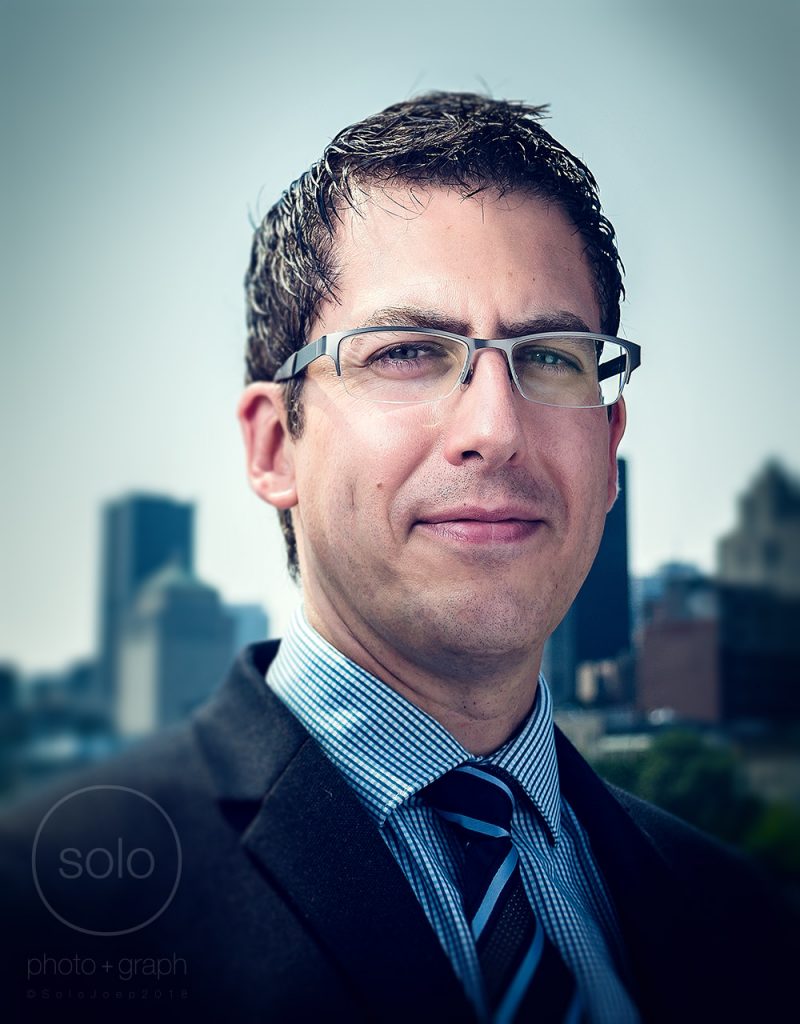
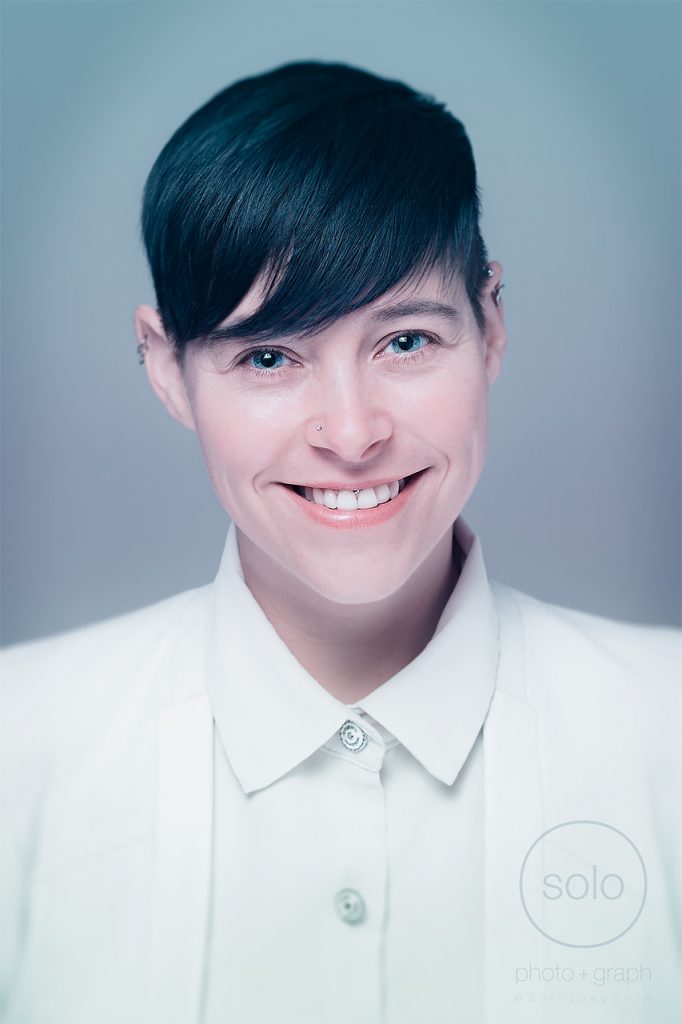
Another good example where ambient light is unwanted would be corporate headshots where the lighting of every model has to be equal. When used for company directories or social media, for example. Also keep in mind quick turnaround of employees is very common, so whenever you’re asked to shoot a few new employees, you’ll have to be able to reproduce the exact same look and be sure all head shots look as if they were shot the same day.
Some advice when it comes to group shots and the issues of people’s availability and turnaround. It seems to make sense to pose a group of people and take a shot, and you’re done!
…But what if people leave or get hired and need to be removed/added to the shot?
To avoid re-shooting the entire group I usually shoot each individual separately instead, under the exact same lighting conditions so they all match, and compose the group in post. This makes swapping out individuals simple and painless, it’s much easier to schedule an individual shoot, and you can get away with a much smaller studio setup.
Lighting a group evenly is trickier than lighting an individual model. In addition you can mix & match when composing the group in post, and since you can focus on each individual during their own personal shoot, it’s fine if they’re a little more picky about the pictures and prefer one over the other.
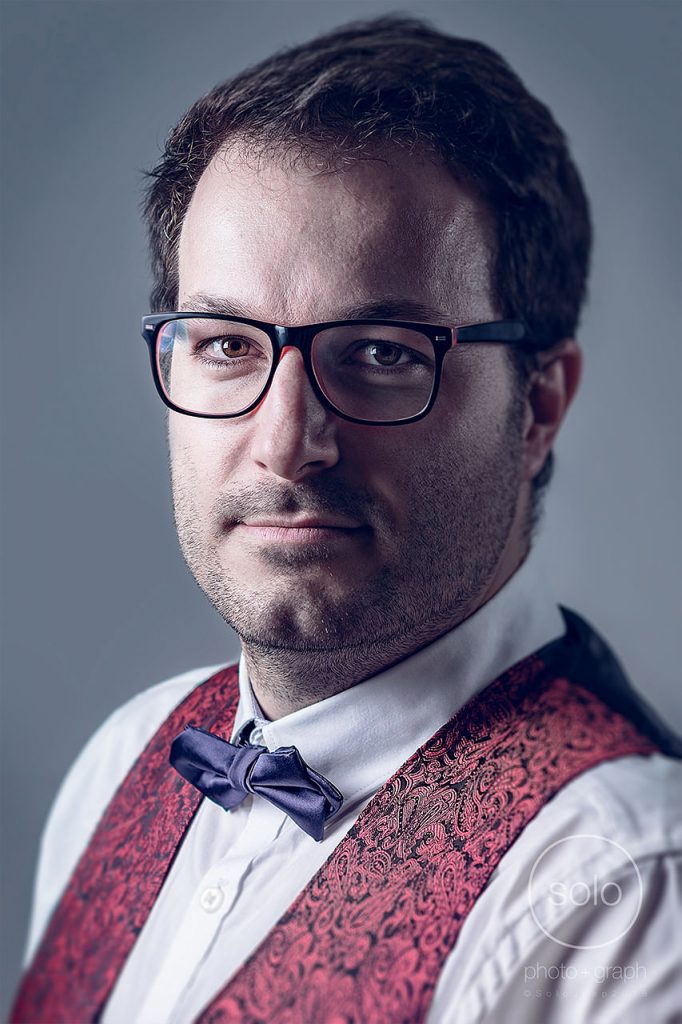
Unfortunately studio setups have their limitations. Besides a backdrop there aren’t many options to add an environment, so the portrait focuses on the subject only. And to give more life and purpose to your subject, its a great idea to shown her/him in their natural habitat, where ambient or natural light is welcome
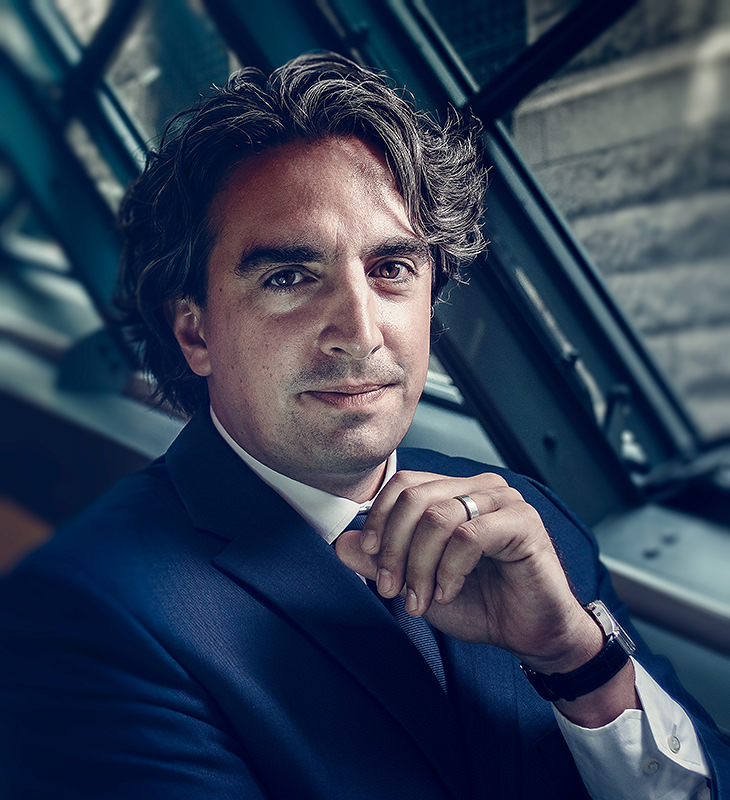
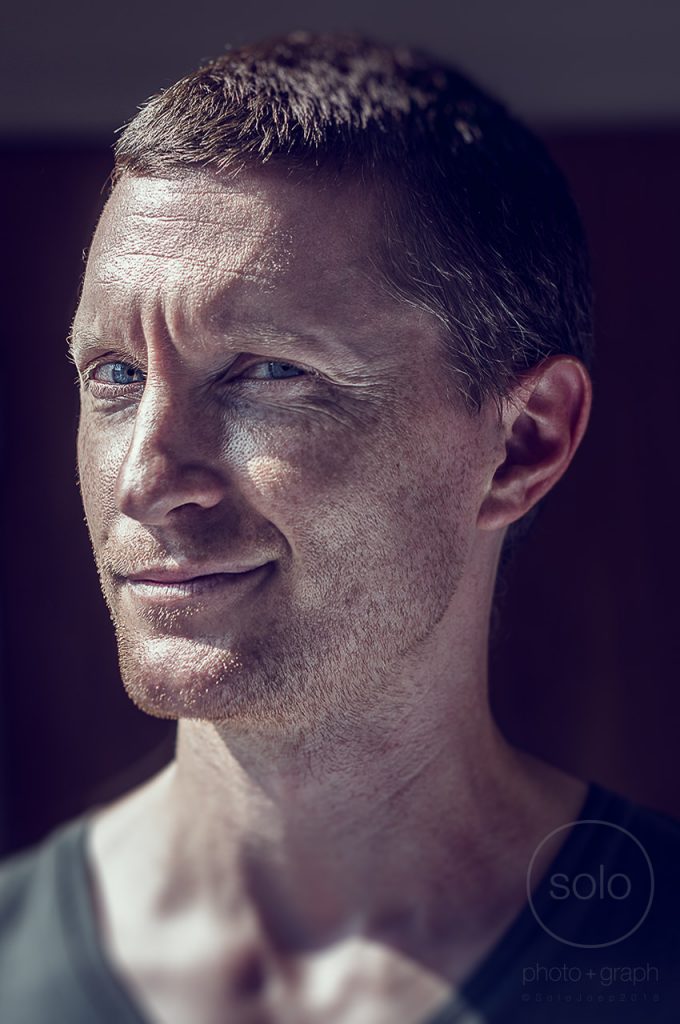
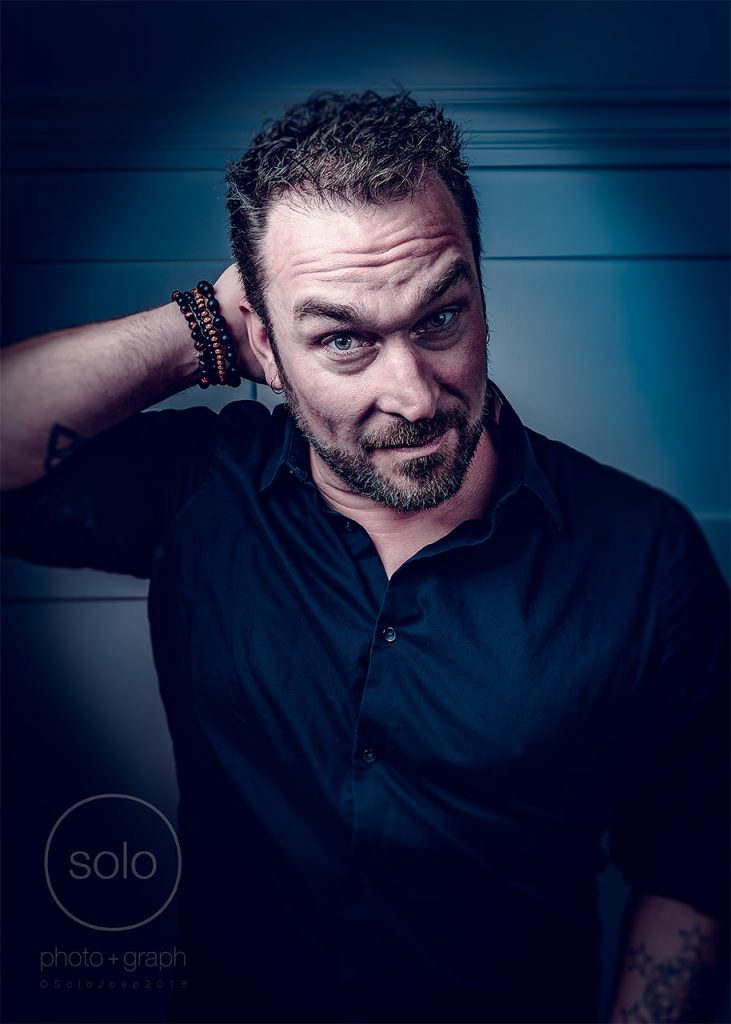
Take editorial portraits, where the subject is placed in an environment allowing the viewer to immediately understand this person’s profession, function, level of importance or even vision. This could be their work environment, like an office with window light, or if the person is shot looking out into the ocean at golden hour, this may imply a visionary predicting the future, or plain fear of their eminent retirement…
You could of course shoot purely using natural light, but personally I like to shape it a little more, give it an accent, by adding an additional light source. This can either be a reflector, speed light or strobe, depending on how bright the natural source is you’re working with (or want/need to overpower it).
Mobile Setup — On-Camera Flash
I like being mobile. And I love me some speed lights. Dragging light stands around is a pain and slow to setup.
Luckily most camera’s have a standard hot shoe to mount your flash onto. So, we’re all set! Oh wait…
The horror when flashing your subjects right into their faces! Ugly light and shadows, flat results and terrified expressions, it’s not great to say the least. So let’s never do this ever again, and here are a few tips to get around it:
- Aim at the ceiling or a wall. A ceiling (given it’s low enough) becomes a huge soft box when flashing into it. The reflected light will light your subject. Soft wrapping light, great! Same for a wall, place your subject besides a wall or corner and simply flash into it, reflecting back onto your model. Just keep in mind the wall (or ceiling) will cast the colour it’s painted in, so it’s best to find a plain rather white-ish or very light (pastel) colored surface to avoid making your subject look like a total smurf.
- Use a bracket to off center in relation to your flash and add a simple modifier to it. Off centering your flash brings more shape to your subjects face and feels more natural. Add a simple inexpensive modifier to diffuse and soften the light and you’re golden!
- Bring your own wall! Yes, bring a wall… You can purchase setups (or DIY like I do) to attach to your camera which are really just a bracket holding a reflective card to bounce your (hot shoe mounted) flash into. The card can be angled to aim for your subject and voilà!
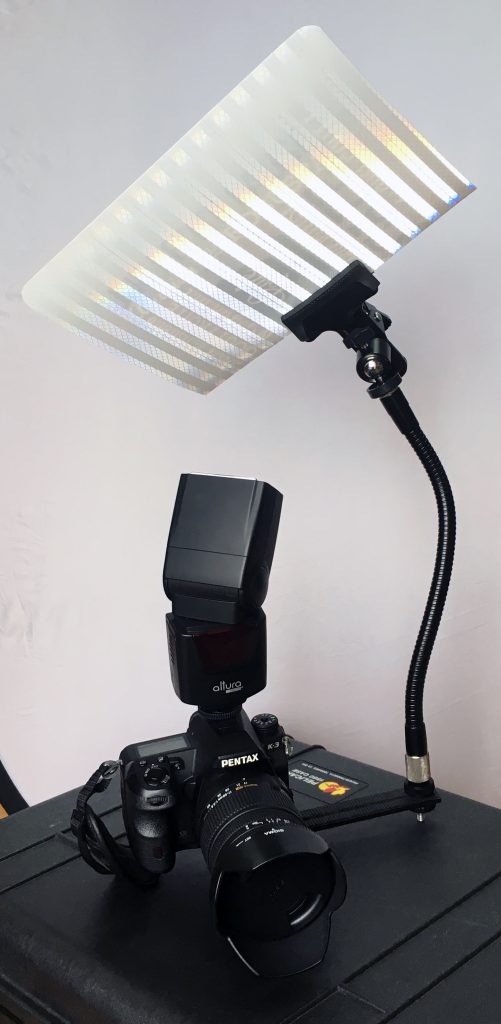
Mobile Setup — Off-Camera Flash
I just have to add this one, as it’s my preferred mobile setup. Using a radio trigger and 1 speed light with a tiny softbox. Either hand held or mounted on a boom stick to add more distance between myself and the subject. The advantage is that it allows me to change the position of the flash rapidly to change the lighting.
Studio Setup — The Inverse Square Law
When working with light in general(but especially in a studio setup), it’s important to understand how light works. When you know how it behaves you can manipulate and control it. To do so you will need to wrap your head around the inverse square law.
It’s tough, chewy and quite tasteless, and guess what? I will NOT bore you with it! Many people have done so before me, and if you’re the technical type and interested in the topic, Mark Wallace of AdoramaTV does a nice job of explaining the topic in this video:
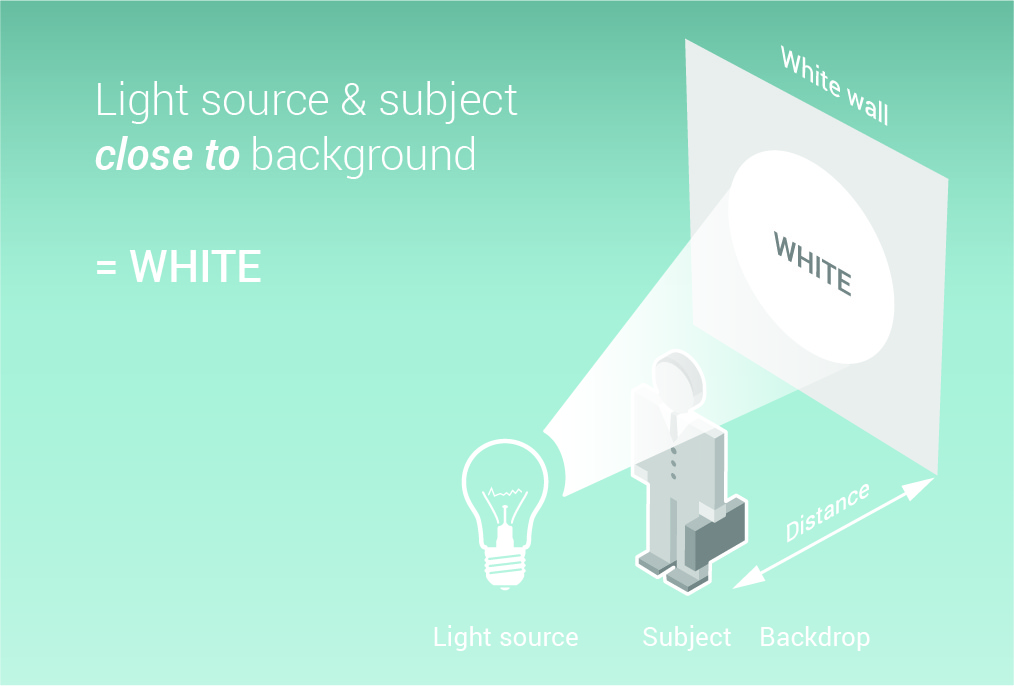
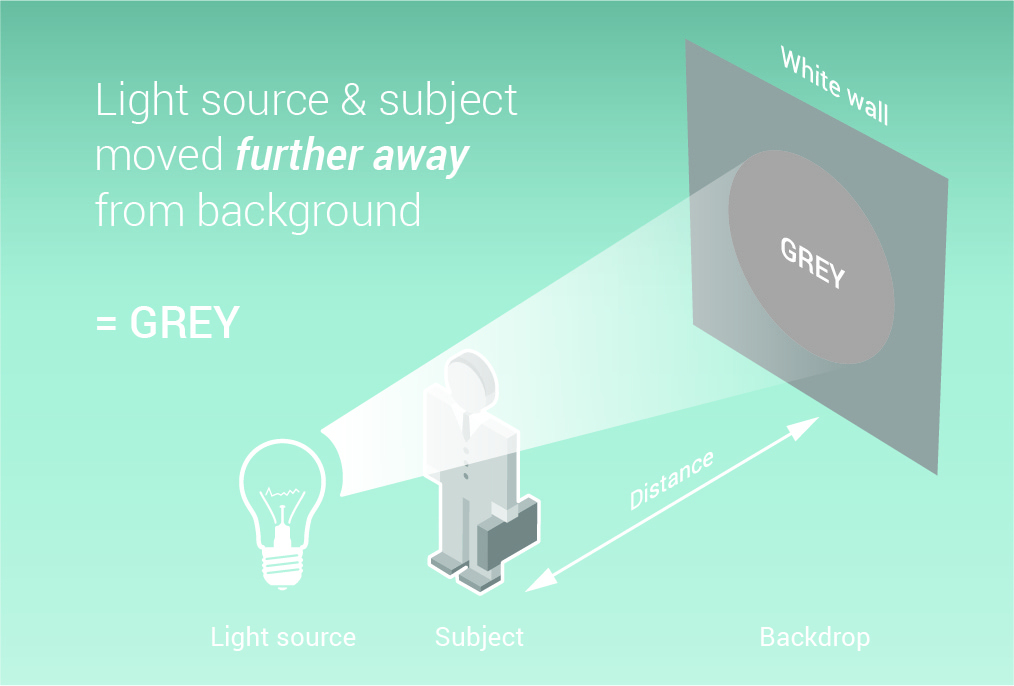
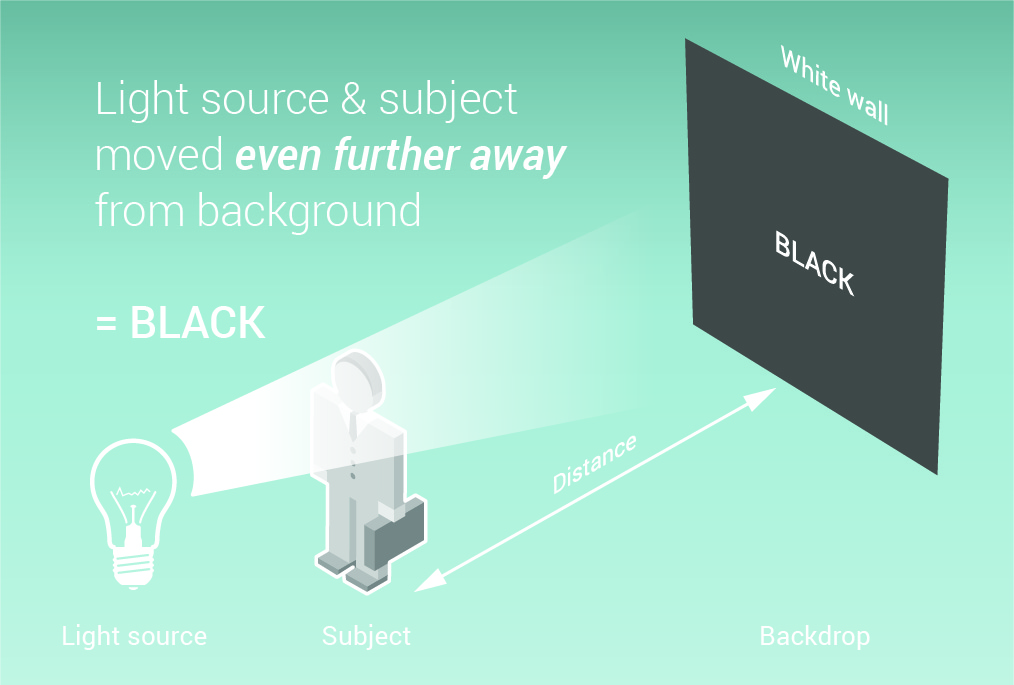
Basically the inverse square law states that: The further away an object (say: model or background) is from the light source (say: strobe), the less it’s affected by it. Simple enough right? Even better, here’s an illustration:
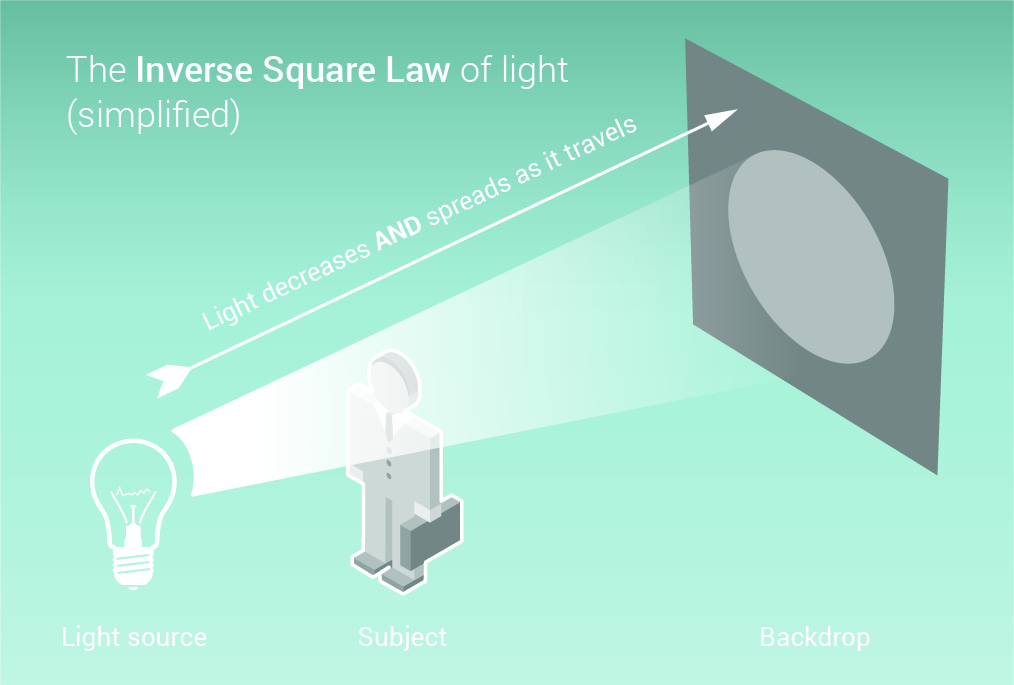
Below I will show you some practical examples where understanding the inverse square law is key in corporate portrait lighting
White Walls are Grey Walls are Black Walls
People have asked me if it’s better to paint each of their walls separately just to have a fitting white, grey or black backdrop readily available, or rather buy a setup for canvas, muslin or paper, or what are the best options?
In my opinion, as long as you don’t shoot full body but portraits, just paint your walls WHITE. Yes plain white..
But what if you want more options?! There are… Now, understanding that distance changes how much light an object receives (inverse square law), we can use this to our advantage in changing the color of a plain white wall to ANY shade of grey, or even black, simply by changing the distance of our subject and light source to the wall.
You can even make it any color you want by adding colored gels to a flash/strobe and aim it at the wall behind your subject. Here’s a simple illustration of how you can change your plain white wall to grey or black, by changing the distance.
Now I live in a tiny condo with limited space, so I can’t create enough distance to put this technique into practice. No problem, simply add a light between the model and the wall to light the wall separately and control the intensity! No need to move anything around.
I’m using 2 speed lights and a simple radio trigger/receiver to pop them from a distance: – 1 speed light (with a small diffuser to spread the light evenly), pointing at the wall – 1 speed light with a simple pop-up soft box to light the model.
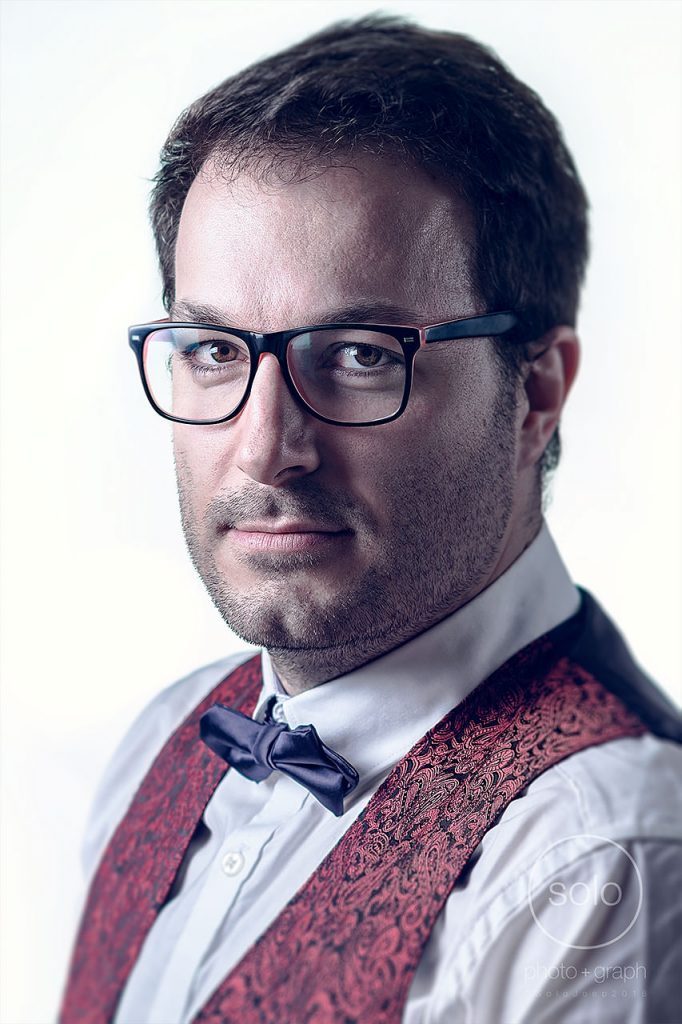
Here’s what the results looks like in practice:
Oh yes, one more option, a green (or blue) screen. In a studio setting where you have control over the background I would not advise adding more post processing time to your workflow if not necessary. However, I’ve encountered situations where it came in very handy.
One time I had to take 50 headshots of employees where the company wanted to ensure the background was exactly the same color as used in their branding. So I decided to use a green screen, key out each employee and add a background in post. This way I could pick the EXACT Pantone colour used in their branding and ensure it would be perfect in print as well as web.
Another time a client obviously was so unsure of what background to decide on in advance, I expected him to get back to me to change it after the shoot. Indeed, I was right, and very happy I had taken a quick shot with him posing in front of a green screen during the shoot!
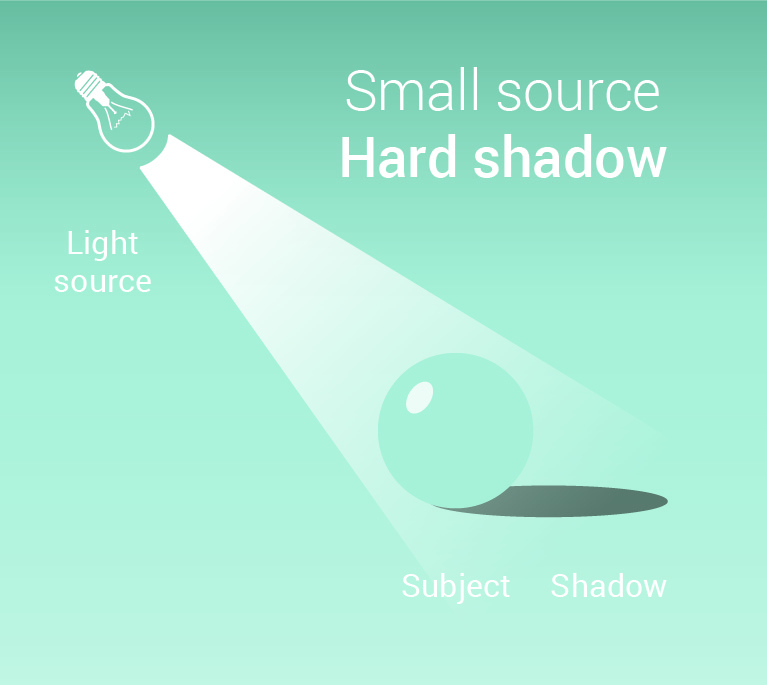
Soft and Hard Shadows
Something to keep in mind, depending on distance and size of the light source versus the subject, shadows will be hard or soft, it’s all about proportion. Basically, a large source shining onto a small subject gives softer light and shadows. If the light source is small in proportion to the subject, the shadow is harder. Now this can be the size of the source vs the subject OR the distance, it’s all about proportions.
Let me put it this way: the sun is huge compared to a human head, however, it’s so far away it’s actually tiny in proportion, so it creates a hard shadow. And if I take a small soft box but put it very close to my subjects head, its HUGE in proportion to the head, so it creates a soft shadow. Maybe an illustration is helpful:
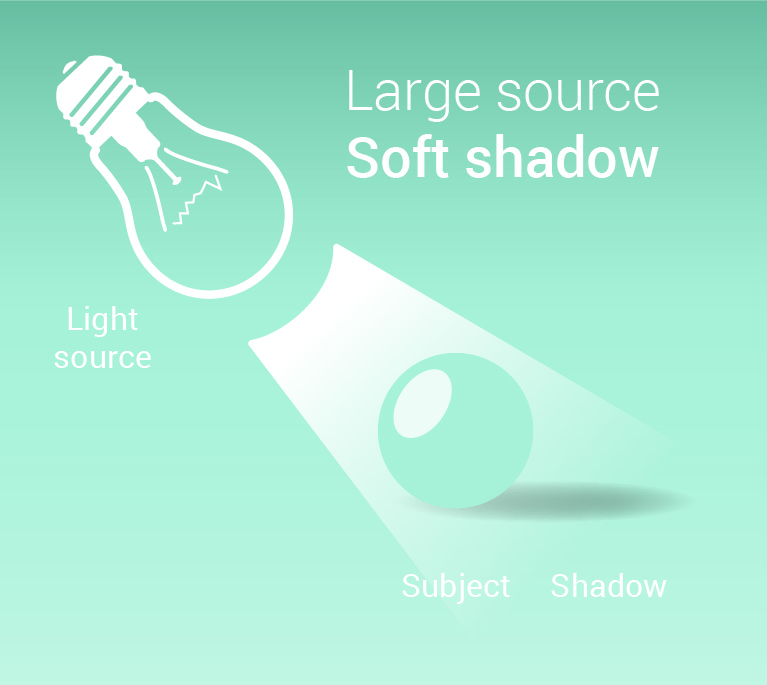
This is also where modifiers play a huge part… In this example a very large soft box and huge reflector were used. Notice how the result is soft and smooth lighting.
Modifiers
Photography is all about shaping light. But why use modifiers and which ones?
Modifiers can be used to diffuse light, direct/focus light, block light, reflect light, absorb light etc. Let me explain what I use in particular. I like to keep things simple, and simple goes a long way.
My main modifier to diffuse the harsh light of speed lights or strobes would a simple (pop-up) soft box. I mainly use square softboxes, sometimes an umbrella or octabox. Additionally a small round soft box or stacked grid to hand held or light up backdrops, in order to add rim or hair lights.
Adding a grid (AKA egg crate or honeycomb) focuses the light. It creates a light beam and reduces light spill (onto the background for example) plus can add to a more dramatic effect.
Finally I would add a reflector, either opposite of the main light source or in line with the camera direction, to fill in those shadows.
In short: – Main light > Softbox (with or without a grid) – Reflector > Silver (more bite) or white (softer) – Optionally an extra light with a small soft box to light up the background or add a rim/ hair light. This is all just to add a little more shape or make the subject pop off the background(if needed).
So what about beauty dishes, umbrellas, rectangular soft boxes, etc. etc.? Each modifier creates its own look, i.e. harder or softer light and shadows. Some spread light and others focus it more. And most come in different sizes. Depending on whether you’re taking headshots or need to light an entire individual, you change the size of the modifier.
In corporate portrait photography the focus is mostly on the subject’s head and focus on the eyes, so keep in mind each modifier creates it’s own distinct catch light. If you prefer a round catch light chose an umbrella, octabox or beautydish; but if you’re mimicking window light in a studio setting, windows are usually square, so you probably want to choose a rectangular shaped modifier. (Pssst secret tip: stick some gaffers tape or duct tape onto a large soft box to create fake window panes that will show up in the catch lights and/or shadow to fake window light).
Post Processing and Final Thoughts
I left out post-processing although it’s such an important piece to the puzzle. This is not the place to go into details on post-processing for corporate portraits, but I do want to stress the importance to learn how to properly process and retouch your corporate portrait photos and whatever you do, do not let your camera spit out a JPEG and call it a day. (RAW files people, SHOOT RAW FILES!)
Corporate portrait lighting, and any other type of photography lighting, is the sum of several areas of expertise: knowing your gear, understanding light, posing your model and post-processing. As you can see from the corporate portrait lighting examples here, just because it’s corporate, doesn’t mean you can’t do creative portrait photography! Learn the theory, practice and go shoot some awesomeness!
Oh and… Keep it simple…