Mastering Cityscape Photography Settings

A striking cityscape… is one where the composition is unique and the exposure is excellent (where the full latitude of the sensor or the film stock is utilized).
I can’t ensure that your compositions will be jaw-dropping, but I can give you some guidelines/suggestions so your exposure does all it can to make your images stand-out.
As always, there are no “rules” in photography, only field-tested maxims that you can break, twist, or follow to achieve an image that only you could think to capture.
Aperture for Cityscape Photography
When shooting cityscapes, one of the primary elements you want to control is the depth of field (a quick working definition of depth of field is: the area in front of and behind the subject that is in acceptable focus), and this is done through aperture control.
Now why would you want to control the depth of field (DOF) in cityscape photography?
Let’s pose another question… what’s important in your composition?
Unlike portraiture, the power of a cityscape comes from having the foreground, middle ground, and background in tack-sharp focus.
I’m a proponent of shooting in “manual” always because successful photography is a combination of craft and creativity, so if you leave it up to the on-board computer to do the craft for you… well, you get my drift. But if you’re new to this, then you can select Aperture Priority (and then the camera’s computer will select the shutter speed for a neutral exposure).
However, if you’re daring enough to go full manual, then in most cases, for cityscapes, you’ll want the highest f-stop you can muster—f/11, f/16 or f/22—depending on your lighting conditions (more on this later though).
During the day, The Sunny-16 Rule can be applied, in most instances, to get the hefty f-stop/DOF combination that you want.
What’s the Sunny-16 Rule, you might ask?
It’s a method to meter a potential image without using the camera’s TTL metering in daylight (it’s a legacy technique from the film days, when cameras didn’t have the built-it light meters).
Basically what you do is set the f-stop at f/16 and then determine your shutter speed based on a reciprocal value of your ISO (for example, ISO 100 = 1/100, ISO 200 = 1/200, etc.) But let’s get to ISO later, and back to the aperture settings.
f/16 provides an extensive amount of depth field, especially on shorter focal length lenses (e.g., 28mm, 35mm, 50mm). You can check out the exact range of the depth of field for your digital camera (or film type) and lens at this handy table (provided by DOFMaster).
But back to what I was saying; f/16 is going to give a healthy amount of DOF, and that, in turn, will give your cityscapes the rich, detailed composition that you want. With cityscapes, you want the viewer to linger over the image absorbing the entire canvas of the frame… and the details available with a deep depth of field are what capture and hold on to the eye.
Shutter Speed
While it’s easy to keep your camera on “automatic” mode (but, as I suggested earlier, you’re relinquishing a large amount of control over your exposures if you do this), you will want to have command over the shutter speed in order to freeze or blur the motion.
Most of the time, with cityscapes, stopping motion and avoiding camera shake/blur works best (e.g. high shutter speeds, 1/250, 1/500, 1/1000, etc.), and you don’t really even give it a second thought.
However, consider injecting a heavy motion blur into your image; this choice can enhance the image in a surreal fashion and push your image into a different category.
Maybe you’re shooting a busy round-about at rush hour and the blur of cars traveling in circles invokes a heightened sense of hectic anxiety characteristic of congested urban roadways or you want to eliminate the faces of the people walking the streets in your image to signify the endless and distancing anonymity of a modern metropolis or perhaps you’re shooting an historic fountain and capturing the water as it defies gravity helps with the picture’s storytelling quality – whatever it is, you can achieve these effects with a slow shutter speed.
These compositions require a speeds at/or below 1/30 (good blur comes when your shutter speed is over 1 sec, 3 to 5 second is something to experiment with. If you want to get a motion blur effect, it’s best to have a tripod handy.
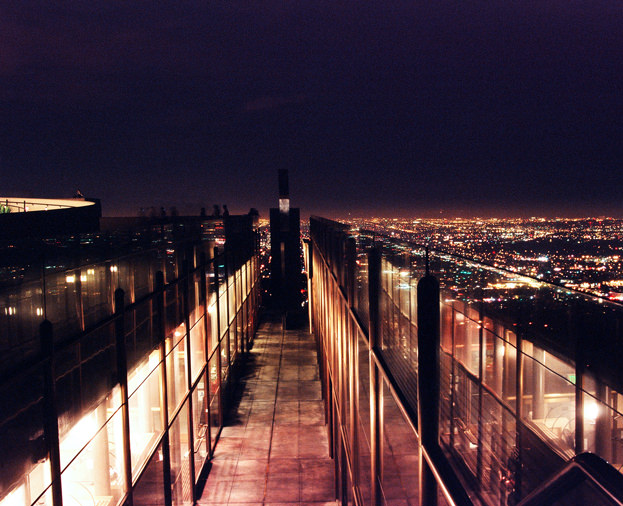
When you’re shooting in low light or even at night, you’ll definitely want a tripod, as you’ll have to use slow shutter speeds.
It’s the only way to achieve the light trails of cars speeding by in the street or to put enough light on the sensor or frame of film to obtain a usable exposure for shots of a city at night.
In my photo of Los Angeles at night from the Griffith Park Observatory, I shot on ISO 100 Kodak film at f/11 for 8 seconds. Although, I bracketed this image (which is taking the same composition at least three times, where the exposure value [EV] is adjusted +1 and -1 to ensure you have the ideal exposure; I will say, if your camera has automatic EV adjustments, then that is a feature to use when you’re shooting with longer shutter speeds; look at your camera’s manual for how this feature works).
The ISO of it All
Fine detail is quite important in a cityscape, and while part of the equation comes from how sharp the image is (courtesy of DOF), you also want to consider the ISO.
The ISO determines the amount of digital noise (or film grain) in your image, and since we’re in the final days of the megapixel wars where the “ultimate goal” is [unnatural] sharpness, you probably want as little noise in your images as possible, which means a shooting at lower ISOs.
I prefer a low ISO, in general (as I shoot with film, primarily and those lower film stocks produce velvety images), but one is almost mandatory for cityscapes (of course, when using slower shutter speeds, you will need to break out a tripod for stabilization).
Fine film grain adds a type of artist texture to a photographic image (which isn’t quite the same with digital noise, so again the lower the ISO the better), and the highlight roll-off is smoother and the shadow detail is more pleasing at lower ISOs. These are liberties you can take when you’re designing the composition of your images.
Juggling White Balance
Let’s talk about white balance.
Experimenting with the white balance, especially when you can dial in temperatures outside of the defaults (5600˚K and 3200˚K) for “white light”, gives you the ability to play with the color of your light sources. And depending on what your subject is and what time of day you take the photo, chances are with conflicting/competing light color you will add a different texture to the image just by using a non-traditional white balance setting.
Of course, you can always adjust your white balance for your photos in post (whether that be to match how the light really was or make a creative interpretation) in Camera RAW, Lightroom, etc.
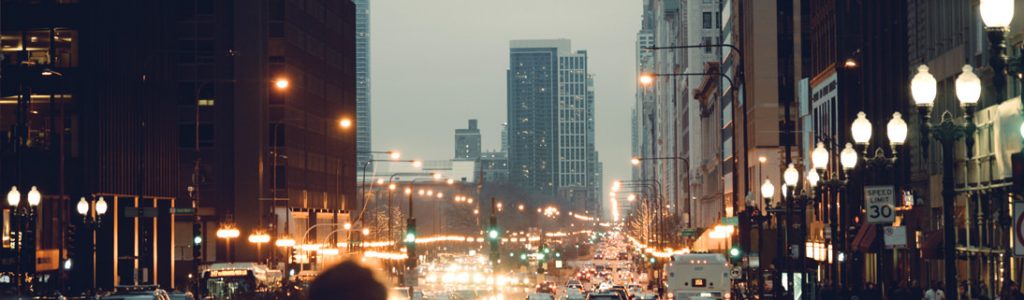
In my photo of Chicago’s Michigan Avenue at dusk, you can see how the mixed-source lighting elevates the dynamics of the image.
Note: this image would have a different dynamic, if I was shooting in monochrome (which I’ve also included, so you can get a sense of how B&W images work just as effectively with mixed-temperatures light sources). This is something to test out in Photoshop—converting an image to monochrome (and making the necessary tonal adjustments)—because you can create a different emotional response by completely desaturating an image.
Back to the color temperature of exterior light sources.
In most cities, the streetlights are sodium vapor and produce various shades of orange light when photographed; although many cities are replacing the sodium vapors with white-light halogens, and you can compensate for this by adjusting the white balance setting to add a creative color punch to your images. Mixed source lighting is definitely an interesting aesthetic you can embrace for night cityscapes.
Related: What White Balance to Use for Night Photography
Closing Thoughts
So there you have it, the various cityscape photography settings you’ll want to experiment with when shooting out shooting in the city streets.
The four settings each imbue their own specific properties to your cityscape shots, and it pays to master them so you can achieve whatever image design comes to mind.
Photography is being able to envision what the camera will capture at any given setting to suit the emotional aesthetic you ultimately want to convey. And mastery of these camera controls will translate to every other photographic road you want to venture down.